When you create a new bill or edit an existing one in Paytron, you’ll be directed to the bills form. The form is broken down into 3 different sections, which are explained in more detail on this page.
When you create a new bill or edit an existing one in Paytron, you’ll be directed to the bills form.
The form is broken down into 3 different sections, which are explained in more detail on this page:
- The bill essentials section, describing essential bill information such as the supplier and invoice number.
- The accounting treatment section, where you can enter information about account codes, tax treatments and other accounting related information.
- The payment preferences section, where you can choose to create a payment for the full amount of your bill.
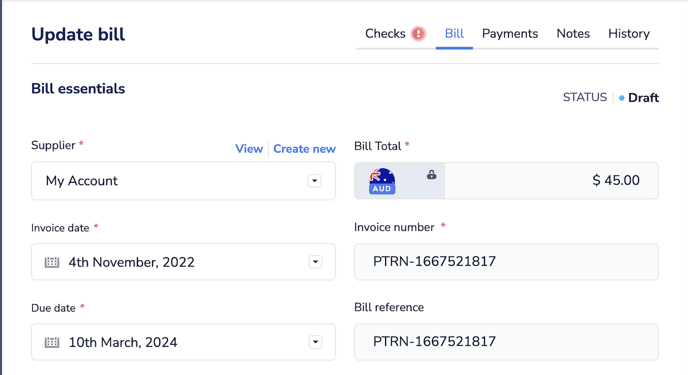
The bill essentials section allows you enter the essential information about this bill and includes the following fields:
- Supplier – The supplier who sent you this bill. You can assign your bill to one of your existing Paytron suppliers or choose to create a new one. The information you provide for the supplier will be used to make any payments against this bill.
- Bill total – The total amount due for this bill including any tax. This amount will be denoted in the same currency specified by your supplier.
- Invoice date – Allows you specify when the invoice should be dated.
- Invoice number – Allows you to specify the invoice number for this bill.
- Due date – Allows you to specify the date your bill is due to be paid.
- Bill reference – The reference for this bill. This information is sent to your supplier on their remittance email to help them reconcile your payments to them.
Accounting Treatment
The accounting treatment section allows you to specify account codes, tax treatment and other information related to your bookkeeping and accounting.
You can choose to enter detailed line-item information for your bill, or you can choose to ignore line-items and enter this information once for the entire bill.
To customise information at a line-item level, select Extract line items to enable the detailed line-item view. See this page <link> on editing line items for more information.
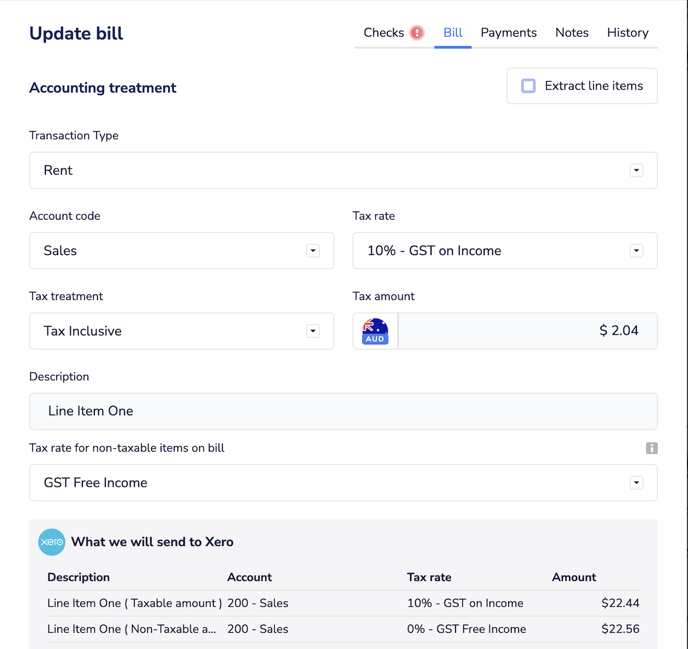
If you choose not to enter detailed line-item information, you can customise the following information in this section:
- Tracking categories – If you have any tracking categories set up in your accounting system, they will be available in this section of the form.
- Account code – Allows you to choose your accounting code or GL code for this bill. Paytron will extract this list from your accounting system if you have connected it to Paytron.
- Tax rate – Allows you to choose the tax rate applicable to your bill. Paytron will extract this list from your accounting system if you have connected it to Paytron.
- Tax treatment – Allows you to specify if the amounts provide are tax-exclusive or tax-inclusive. This will affect how we calculate the total taxable amount on your bill.
- Tax amount – Paytron will automatically display the taxable amount here if you have entered the above information. However, if you wish to enter a custom tax amount, you can do so here.
- Description – When syncing with your accounting system, Paytron will be required to provide at least one line item on your bill. The description field on the bills form allows you to optionally specify a description for this line item.
- Tax rate for non-taxable items on bill – If you specify a taxable amount that is less than the amount we automatically calculated based on the provided information, this field will allow you to specify the tax rate / code for the non-taxable amount on the bill.
- What we will send to Xero – If you have connected your Paytron account to Xero, once you have provided all the required information, you will see a preview of the bill as it would appear in Xero at the bottom of this section.
Payment Preferences
This optional section allows you to create a payment for the full amount of your bill as you submit it to Paytron. You can use this section to save time creating Paytron payments when you know ahead of time when your bill will be paid.

To enable the form for this section, select the checkbox labelled Schedule payment. You’ll then see several fields that allow you to customise when and how this bill is paid.
- Planned payment date – Allows you to specify the scheduled payment date for the payment.
- Funding CCY – Paytron allows you to fund payments from different currencies, so if you want to make a payment in US Dollars, you can use Australian Dollars to fund the payment. This section allows you to choose which currency you want to use to fund your bill payment.
- Funding method – Paytron offers several ways to keep your account topped up and make sure you have the funds required to make your bill payment. This box will allow you to choose between the different ways to add the required funding amount to your Paytron account.
- Payment reason – In some countries, Paytron is required to provide additional information about your payment to meet local regulations. If you are paying a country with this requirement, for example India or Indonesia, you will be able to specify this information here.
- Total cost to you – The total cost to you section shows you a break down of how much it will cost to fund your payment, including any payment fees, funding fees and the currency exchange rate if you’re doing a cross-currency payment.